Installation
There are several ways to install Mautic, you should select the most appropriate method for your situation and technical knowledge.
Installing using the production package, with either the web-based installer or from the command line.
Installing locally by cloning from GitHub - for testing and local development,
Using the production package
You can install the Mautic production package either by uploading the zipped installation package into the server location or using the command-line installation. The Mautic production package also requires access to a database server.
The Mautic installation is a three-step process:
Integrate the database server with the Mautic server.
Create an administrator account to access the Mautic server.
Set up the Email server for Email marketing automation.
Preparing for installation
Before installing a package, ensure that:
Your server environment meets the minimum requirements for the version you are installing. Read more in Mautic’s Requirements.
Your server directory is writable by the Mautic web server.
Your database meets the minimum requirements for the supported databases and valid User permissions to access to the database. Read more in Mautic’s Requirements.
Your server has enough free disk space to run the installation. Consider the database size as well.
PHP’s
max_execution_timeis at least 240 seconds.
Downloading a production package
To get started Download Mautic to access the zip file of the latest stable release.
For more information about the available Mautic packages, visit the Mautic Releases Landing Page.
Uploading the production package
After downloading a desired package, upload the package zip file to your web server, and unzip it in the directory where you plan to host the Mautic instance.
Your web server must have the permissions to access the unzipped files.
Using the web-based installer
To access the Mautic server from your browser, enter the URL that corresponds to the Mautic instance (for example, https://m.example.com) in your web browser. It’s recommended to secure your installation with an SSL certificate (https).
Conducting environment checks
After loading the package in the server, the Mautic installer validates if it can run successfully in your server environment.
You must resolve installation errors, displayed in red, before completing the Mautic package installation successfully. Warnings, displayed in orange, are often recommendations for a better Mautic experience.
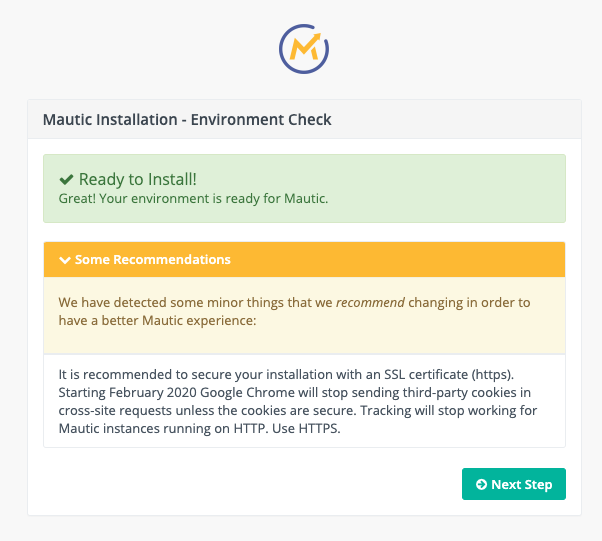
If the environment checks are successful - displayed in green - click Next Step to begin the installation process.
Integrating the database
Mautic assumes that the database is on the same server as Mautic.
For setting the database server on the Mautic Installation-Database Setup window:
Select Database Driver.
Enter Database Host.
Enter Database Name.
Enter Database Username.
If desired, you can also enter values for Database Port, Database Table Prefix, Database Password, and Prefix for backup tables.
Backup existing tables? is on by default, but you should turn it off for a new installation.
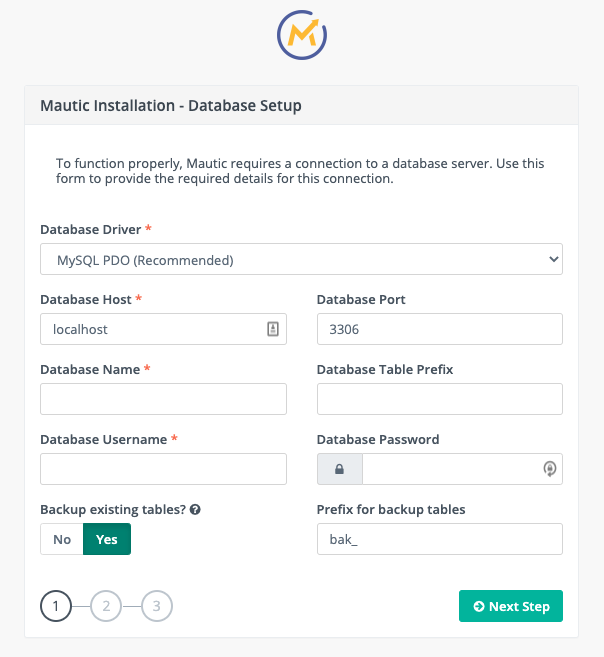
Click Next Step.
Creating the administrator account
To create an Administrator account for your Mautic instance, enter values for the different fields on the Mautic Installation - Administrative User window.
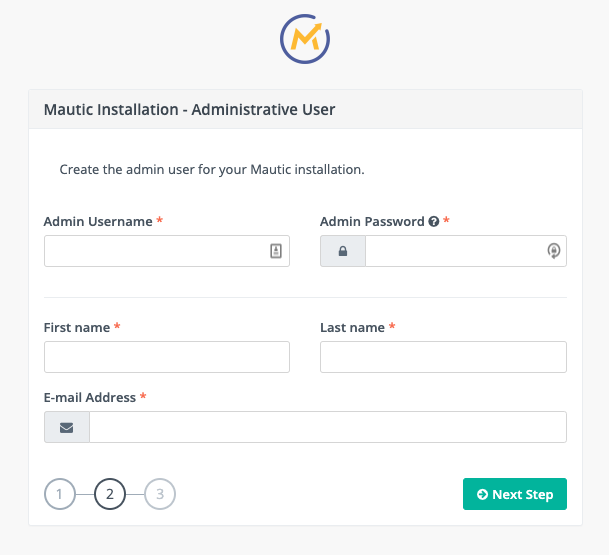
Click Next Step.
Configuring Email settings
To configure your Email settings for your Mautic instance, enter details of your Email provider on the Mautic Installation - Email Configuration window. You can use a tool such as Mailhog to configure a local instance for testing.
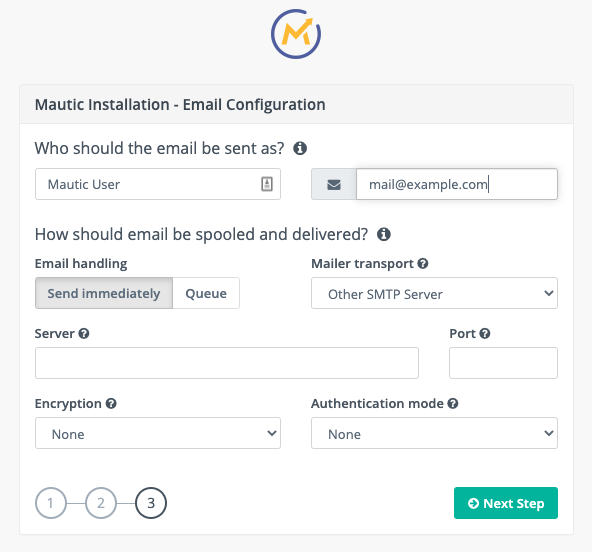
For configuring your Email sender settings:
Enter the name and Email address to use with all outgoing Email communications by default. Verify that the provided Email address has been successfully authorized by your Email provider.
Queue Emails and send them through a cron job - to trigger the queue processing - instead of sending them immediately for larger instances of Email handling.
Select Mailer transport. If your provider isn’t listed, select Other SMTP Server and provide the SMTP credentials. API-based sending is significantly faster than SMTP. Depending on the provider you select, additional fields appear to allow you to enter API keys and select regions.
Enter Server and Port for your Email provider.
Select Encryption and Authentication mode for your Email provider.
Click Next Step to log into the Mautic server.
Logging into Mautic
On the Mautic login window, enter your Mautic administrator credentials to log into your Mautic instance.
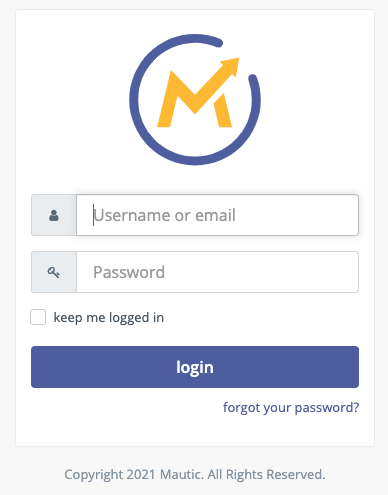
Click login to continue working on your Mautic instance.
Installing with command line
You can also install Mautic using the command line. You can either pass the settings parameters in the command, or create a local PHP file with your database settings. You can also define properties in this file using the syntax expected by the command-line options. Note that Mautic requires a complex password from version 5.1.
Use the command path/to/php bin/console mautic:install --help for the list of options and flags available.
--db_driver=DB_DRIVER                    Database driver. [default: "pdo_mysql"]
 --db_host=DB_HOST                        Database host.
 --db_port=DB_PORT                        Database port.
 --db_name=DB_NAME                        Database name.
 --db_user=DB_USER                        Database user.
 --db_password=DB_PASSWORD                Database password.
 --db_table_prefix=DB_TABLE_PREFIX        Database tables prefix.
 --db_backup_tables=DB_BACKUP_TABLES      Backup database tables if they exist; otherwise drop them. [default: true]
 --db_backup_prefix=DB_BACKUP_PREFIX      Database backup tables prefix. [default: "bak_"]
 --admin_firstname=ADMIN_FIRSTNAME        Admin first name.
 --admin_lastname=ADMIN_LASTNAME          Admin last name.
 --admin_username=ADMIN_USERNAME          Admin username.
 --admin_email=ADMIN_EMAIL                Admin email.
 --admin_password=ADMIN_PASSWORD          Admin user.
 --mailer_from_name[=MAILER_FROM_NAME]    From name for email sent from Mautic.
 --mailer_from_email[=MAILER_FROM_EMAIL]  From email sent from Mautic.
 --mailer_transport[=MAILER_TRANSPORT]    Mail transport.
 --mailer_host=MAILER_HOST                SMTP host.
 --mailer_port=MAILER_PORT                SMTP port.
 --mailer_user=MAILER_USER                SMTP username.
 --mailer_password[=MAILER_PASSWORD]      SMTP password.
 --mailer_encryption[=MAILER_ENCRYPTION]  SMTP encryption (null|tls|ssl).
 --mailer_auth_mode[=MAILER_AUTH_MODE]    SMTP auth mode (null|plain|login|cram-md5).
 --mailer_spool_type=MAILER_SPOOL_TYPE    Spool mode (file|memory).
 --mailer_spool_path=MAILER_SPOOL_PATH    Spool path.
Use the syntax below within a local.php file:
<?php
// Example local.php to test install (to adapt of course)
$parameters = array(
  // Do not set db_driver and mailer_from_name as they are used to assume Mautic is installed
  'db_host' => 'localhost',
  'db_table_prefix' => null,
  'db_port' => 3306,
  'db_name' => 'mautic',
  'db_user' => 'mautic',
  'db_password' => 'mautic',
  'db_backup_tables' => false,
  'db_backup_prefix' => 'bak_',
  'admin_email' => 'admin@example.com',
  'admin_password' => 'Maut1cR0cks!',
  'mailer_transport' => null,
  'mailer_host' => null,
  'mailer_port' => null,
  'mailer_user' => null,
  'mailer_password' => null,
  'mailer_api_key' => null,
  'mailer_encryption' => null,
  'mailer_auth_mode' => null,
);
Installing with a local PHP file
Run the following command after replacing the path to PHP bin and Mautic instance URL.
path/to/php bin/console mautic:install https://m.example.com
If desired, you can also add parameters in the install command:
path/to/php bin/console mautic:install https://m.example.com
--mailer_from_name="Example From Name" --mailer_from_email="mautic@localhost"
--mailer_transport="smtp" --mailer_host="localhost" --mailer_port="1025"
--db_driver="pdo_mysql" --db_host="db" --db_port="3306" --db_name="db" --db_user="db" --db_password="db"
--db_backup_tables="false" --admin_email="admin@mautic.local" --admin_password="Maut1cR0cks!"
As the installation process begins, it flags up warnings and aborts if there are any critical errors.
Mautic Install
==============

Parsing options and arguments...
0 - Checking installation requirements...
Missing optional settings:
  - [0] The <strong>memory_limit</strong> setting in your PHP configuration is lower than the suggested minimum limit of %min_memory_limit%. Mautic can have performance issues with large datasets without sufficient memory.
Ready to Install!
1 - Creating database...
1.1 - Creating schema...
1.2 - Loading fixtures...
2 - Creating admin user...
3 - Email configuration and final steps...

================
Install complete
================
You can now login to your Mautic instance with your Mautic Admin credentials.
Installing from GitHub
It’s essential to have all the files locally - including automated tests - from the GitHub repository when testing Mautic or contributing to it. Many of these files aren’t included in the production build process.
Cloning Mautic from GitHub
Install the GitHub CLI tool.
Click Fork at the top-right corner of the Mautic GitHub repository to make a personal fork. You can also click to go directly to your fork if you already have one, if you don’t then GitHub offers to create one.
After the fork is complete, click the green Code button to access the command for cloning the repository.
Switch to your terminal, and when in the directory where you wish to install Mautic, paste the command using the GitHub CLI tool this is in the format:
gh repo clone username/mautic
Nota
Please always choose to fork into a personal account rather than an organization. The latter prevents Mautic’s maintainers from working with your Pull Request.
Install Mautic using DDEV
You can use DDEV which Mautic recommends for testing and development. To get started:
Install DDEV.
Install and ensure you have Docker running on your system.
You can now change into the Mautic directory and kick off the DDEV quickstart using the command:
ddev start
Nota
For troubleshooting see DDEV Troubleshooting.
See Mautic’s Handbook for more detailed instructions.
This spins up a DDEV instance (which includes Mailhog, PHPMyAdmin, and Redis Commander) - by default at https://mautic.ddev.site - and also gives the option to set up Mautic ready for you to use.
.. vale on
This runs through the Composer install process, and installs Mautic at the command line with a default username of admin and password of Maut1cR0cks! (note: pre Mautic 5.1 the password is just mautic.
Installing with Composer
Since Mautic 4.0 it’s possible to install and manage Mautic using the full power of Composer. Mautic uses the latest version of Composer.
Mautic is in the process of decoupling Plugins and Themes from core, however at present while they have been technically mirrored out into separate repositories, the source files remain in the main Mautic GitHub repository.
When you clone from GitHub, running composer install installs all the dependencies, there are some other handy features which you can take advantage of when installing and managing Mautic.
Using the Recommended Project
The Mautic Recommended Project is a template which provides a starter kit for managing your Mautic dependencies with Composer.
Nota
The instructions below refer to the global Composer installation. You might need to replace Composer with php composer.phar or something similar for your setup.
The basic command to use the Recommended Project is:
composer create-project mautic/recommended-project:^5 some-dir --no-interaction
With Composer you can add new dependencies to install along with Mautic:
cd your-directory
composer require mautic/mautic/helloworld-bundle
The Composer create-project command passes ownership of all files to the created project. You should create a new git repository, and commit all files not excluded by the .gitignore file.
What does the Recommended Project template actually do?
When installing the given composer.json the following occurs:
Install Mautic in the
docrootdirectory.Autoloader uses the generated Composer autoloader in
vendor/autoload.php, instead of the one provided by Mautic indocroot/vendor/autoload.php.Plugins - packages of type
mautic-plugin- are indocroot/plugins/.Themes - packages of type
mautic-theme- are indocroot/themes/.Creates
docroot/mediadirectory.Creates environment variables based on your
.envfile. See.env.example.
Composer FAQs
Should you commit downloaded third party Plugins?
Composer says that the general recommendation is no.. They provide arguments against but also workarounds if a project decides to do it anyway.
Should you commit the scaffolding files?
The Mautic Composer scaffold Plugin can download the scaffold files - for example index.php, .htaccess - to the docroot/ directory of your project.
If you haven’t customized those files you could choose to not commit them in your version control system - for example, git. If that’s the case for your project it might be convenient to automatically run the Mautic Scaffold Plugin after every install or update of your project.
You can achieve that by registering @composer mautic:scaffold as post-install and post-update command in your composer.json:
"scripts": {
    "post-install-cmd": [
        "@composer mautic:scaffold",
        "..."
    ],
    "post-update-cmd": [
        "@composer mautic:scaffold",
        "..."
    ]
},
How can you apply patches to downloaded Plugins?
If you need to apply patches - depending on the Plugin, a pull request is often a better solution - you can do so with the composer-patches Plugin.
To add a patch to Mautic Plugin foobar insert the patches section in the extra section of composer.json:
"extra": {
    "patches": {
        "mautic/foobar": {
            "Patch description": "URL or local path to patch"
        }
    }
}
How can you specify a PHP version?
This project supports PHP 7.4 as the minimum version currently - review Mautic’s Requirements however, it’s possible that a Composer update may upgrade some package that could then require PHP 7+ or 8+.
To prevent this you can add this code to specify the PHP version you want to use in the config section of composer.json:
"config": {
    "sort-packages": true,
    "platform": {
        "php": "7.4"
    }
},
How can you use another folder than docroot as the root folder?
By default the composer.json file places all Mautic core, Plugin and Theme files in the docroot folder.
It’s possible to change this folder to your own needs.
In following examples, docroot moves into public.
New installations
Run the create-project command without installing:
composer create-project mautic/recommended-project:^4 some-dir --no-interaction --no-install
Do a find and replace in the
composer.jsonfile to changedocroot/intopublic/Review the changes in the
composer.jsonfile to ensure that there are no unintentional replacementsRun
composer installto install all dependencies in the correct location
Existing installations
Move the
docroot/topublic/
mv docroot public
Do a find and replace in the
composer.jsonfile to changedocroot/topublic/Review the changes in the
composer.jsonfile to ensure that there are no unintentional replacementsRun
composer update --lockto ensure the autoloader is aware of the changed folder
Setting up a local testing environment with DDEV
Often there is a need to have a local environment for testing Mautic - for example making a backup, testing new features or bug fixes.
In Mautic, DDEV is the tool of choice for this purpose. It’s very easy to work with.
To learn how to set up DDEV with Mautic, please review the documentation in the Contributors Handbook.