Emails
Mautic enables marketers to automatically send Emails directly to a group of Contacts in a Segment by using a Campaign, or send Emails on a one-time basis. Emails provide a means for direct interaction with potential customers, clients, and Contacts.
Email types
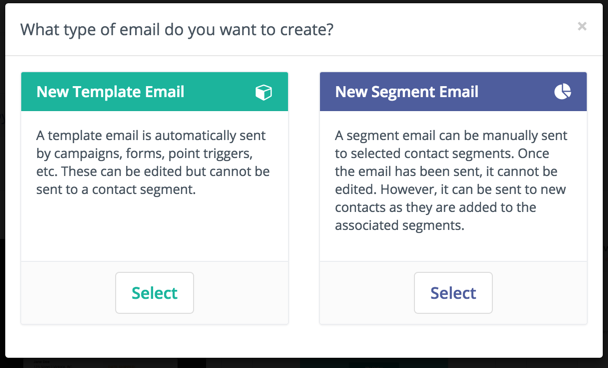
There are two types of Emails: template and Segment - broadcast - Emails.
Template Emails
Template Emails are transactional by default. They’re used in Campaigns, Form submit actions, Point Triggers, etc. It’s possible to send template Emails to the same Contact multiple times. You can’t send template Emails to a Contact outside of another Mautic Component except when sending an Email directly to a Contact - in this case Mautic clones the content.
Nota
For this reason, template Emails sent directly to a Contact aren’t associated with the template Email itself and thus stats aren’t tracked against it.
Segment (Broadcast) Emails
Segment Emails are marketing Emails by default. On creation the marketer assigns Segments to the Email. This determines which Contacts receive the communication. Note that each Contact can only receive the Email once - it’s like a mailing list.
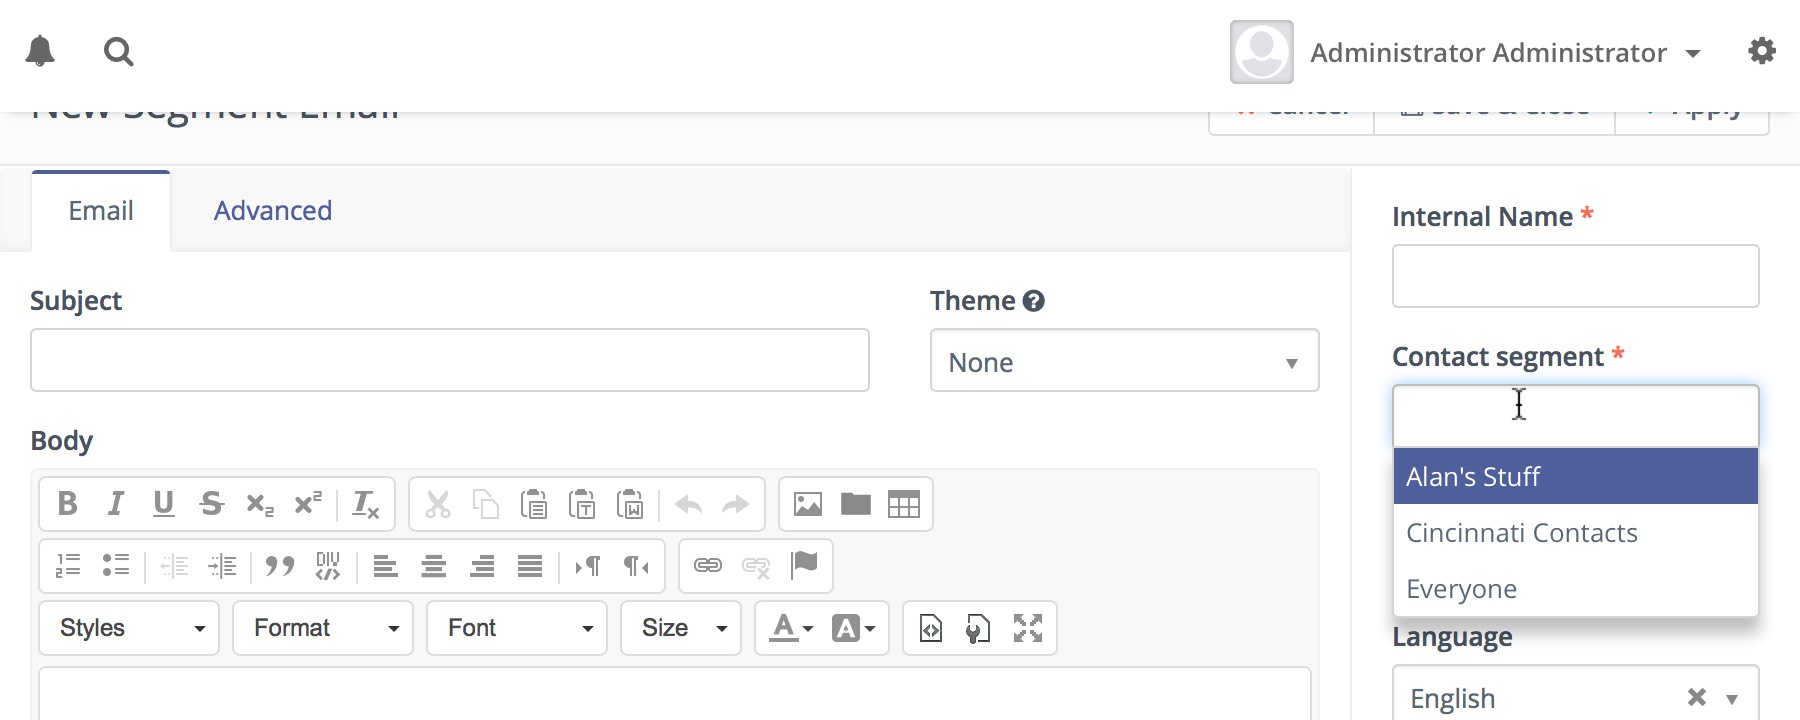
This entry field is a multi-select which allows you to choose several Segments if necessary.
Excluding Segments
There is a multi-select field that allows excluding Contacts belonging given Segments.

Mautic initiates the sending of these Emails with a Cron jobs - see section on Send Scheduled Broadcasts - for example, Segment Emails - for more details on this.
A/B testing for Segment Emails
A/B testing lets you split test a Segment Email against one or more variants to find the version that performs best. Mautic sends each variant to a small slice of your audience, picks a winner based on criteria you choose, then sends the winning version to everyone else.
Nota
You can only convert a Segment Email to an A/B test before you send it. The Convert to A/B test card appears only on Segment Emails with zero sends.
Converting an Email to an A/B test
Open a Segment Email that you haven’t sent yet.
In the right-hand column of the Email detail view, find the Convert to A/B test card and select it.

In the Convert to A/B test email dialog, set the initial test parameters:
How to pick the winner - the criteria Mautic uses to choose the winning variant, such as Read rate or Clickthrough rate.
Wait before picking winner - how long Mautic waits - in hours - after sending the test Emails before it picks the winner. This gives Contacts time to open and click. The default is 24 hours.
Test audience size - the percentage of your Contacts that receive the test Emails, split evenly between variants. The remaining Contacts receive the winning version. The default is 10%.

Click Save & Close.
These settings only set up the test. You can change them any time before the test starts sending. After conversion, the right-hand column replaces the card with the A/B Test panel, where you manage variants, settings, and sending from one place.
Managing variants
You manage the whole test from the A/B Test panel in the right-hand column. The original Email counts as the first variant, so you need at least one more - two in total - before you can schedule the test. Until you add one, the panel shows a reminder.
Mautic divides the test audience evenly between all Active variants, including the original Email.
Adding a variant
To add a variant:
Select Add variant +. Mautic creates a copy that you can edit.
Change the subject line, content, or design you want to test.
Click Save & Close.
Each variant appears in the panel tagged as an “A/B variant” of the original Email. In the list of Emails, a variant has a symbol. When you hover over the symbol, it shows “Is A/B variant”.

Editing and deleting a variant
There are two ways to edit and delete a variant:
From individual Email variant:
To edit, click the Edit button at the top right.
To remove, click the down arrow button to open the Options, then select Delete.
From the list of Emails:
Select the three dots icon next to the Email variant you want to modify.
Select Edit to edit the variant or Delete to remove it.
Adjusting A/B test settings
To change the winner criteria, wait time, or test audience size after conversion, select the settings - gear icon - at the top of the A/B Test panel. You can adjust these values any time before the test starts sending.
Scheduling the A/B test
Once you have at least two variants, the panel shows a Schedule sending button along with a summary of the test - for example, that 10% of your Contacts receive test variants and that Mautic picks the winner after 24 hours.

Select Schedule sending.
Choose the date and time to begin sending, then confirm.
The Email moves to a Scheduled for future send state, and the panel shows when sending starts. To change the timing, use the Reschedule sending button.
Nota
For A/B test Emails, Mautic hides the Send button in the header. Schedule and send the test from the “A/B Test” panel using Schedule sending.
Sending and determining the winner
When sending begins, Mautic sends the test Emails to the test audience and the panel shows that the test is running, along with a countdown to when Mautic picks the winner.
After the wait time passes, Mautic evaluates each variant against your chosen winner criteria, marks the best performer with a Winner badge in the panel, and sends the winning version to the remaining Contacts.
Viewing A/B test results
Once the test is sending, the panel shows an A/B Test Stats button. Select it to compare how each variant is performing and to see which variant Mautic picked as the winner.

Email formats
In Mautic, it’s possible to create Emails in both full HTML as well as basic text format - delivered as necessary to Contacts based on what their client supports. This is an important part of creating a strong relationship with Contacts by providing relevant information in the correct format.
Managing Emails
Email overview
The Email overview allows at-a-glance information regarding the success or failure of a particular Email. You can quickly see relevant information in regards to opens, bounces, successful click-throughs and other important statistics.
Email content preview
The Email details page shows a rendered preview of the Email content in the right column, so you can see how an Email looks without opening the Builder or a separate tab. This is handy when you’re comparing several Emails to find the one you want.
The preview reflects your selection in the Preview URL panel below it. Choose an A/B variant from Show preview for A/B variant, a translation from Show preview for translation, or enter a Contact in Show preview for contact to see the Email as that Contact would receive it. Mautic reloads the preview automatically to match the version you’ve selected.

Segments used
On a Segment Email’s detail page, Mautic lists the Segments the Email targets in a Segments used section below the content preview. Each Segment appears as a colored tag, so you can see at a glance which audiences receive the Email. This section only appears for Segment - broadcast - Emails, not template Emails.

The tag colors are decorative and carry no meaning. Mautic assigns them in order from a fixed palette.
Each tag links to the Segment’s detail page when you have permission to view that Segment. Mautic checks this permission for each Segment separately, so if you can view some of the targeted Segments but not others, only the ones you can view appear as links - the others still show their names as plain tags. A User who can view Emails but not Segments sees every Segment name without a link.
For more information on Segments, see Managing Segments.
At the top of the Email details page, a row of stat cards summarizes how the Email is performing. Each card links to a filtered Contact list, so you can see exactly which Contacts it represents.

Sent - The number of Contacts that have received this Email, including both successful and failed sends, for the entire time period.
Read - The number of Contacts that have read this Email, shown alongside the read percentage.
Queued - The number of Contacts that have this Email queued to send based on their frequency rules.
Pending - The number of Contacts that haven’t yet received this Email. This card appears only for Segment Emails. Triggered Emails - those used in a Campaign rather than sent to a Segment - don’t show the Pending card because Mautic schedules them differently or sends them immediately.
Email Drafts
Creating a draft Email
Mautic allows the creation of Email Drafts using the “Save as Draft” button in the Email editor.
This feature needs turning on by adding the configuration parameter email_draft_enabled to your local.php configuration file as detailed below.
'email_draft_enabled' => 1
Once turned on, the “Save as Draft” button appears on the Email edit interface.
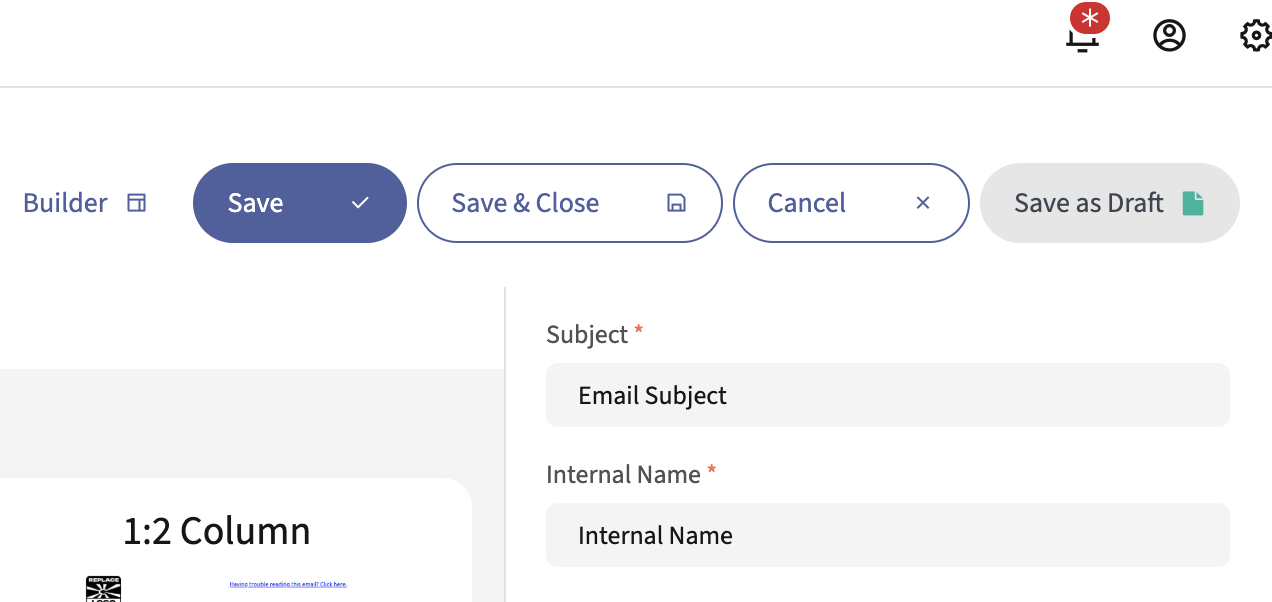
Only one Draft at a time can exist for any given Email. When working with a Draft, the “Save as draft” button instead displays two buttons, “Apply Draft” and “Discard Draft”.
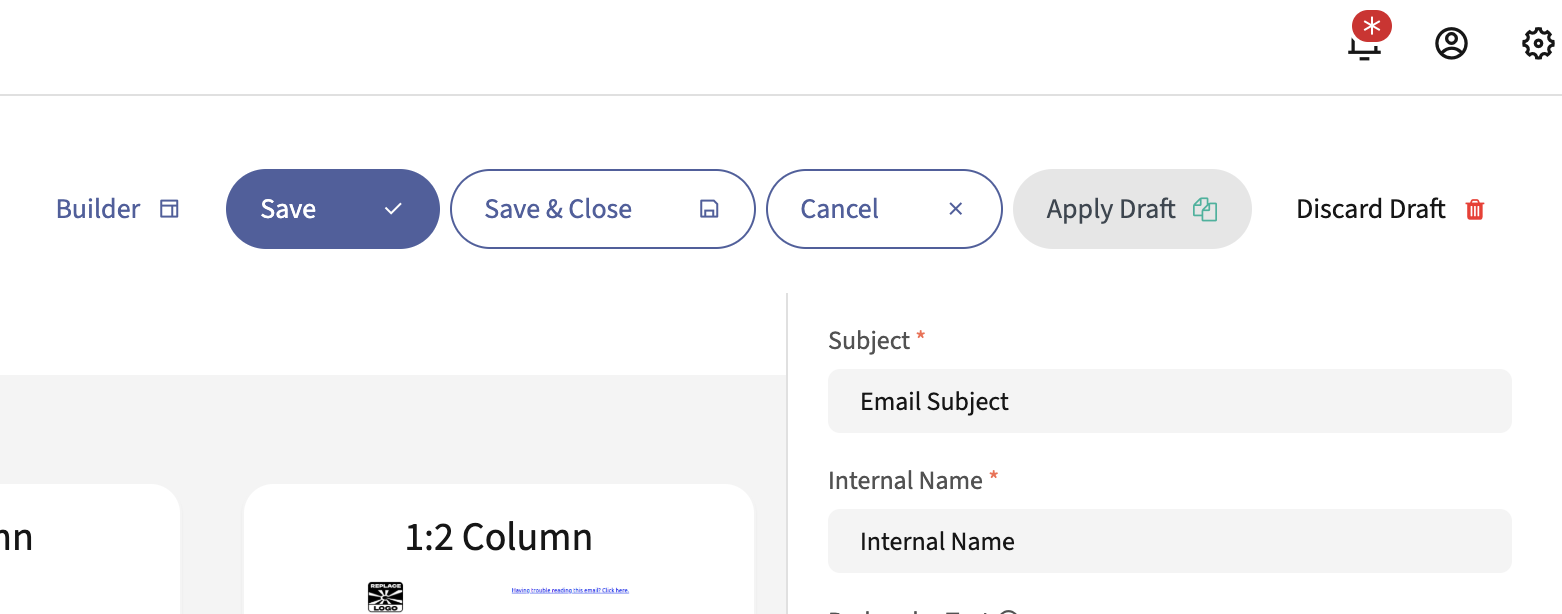
An Email Draft allows changes to the content of the Email only. Changes to the Subject, Internal Name, selected Segment, etc. apply to the original Email even when editing a Draft version of it. The Draft content exists separately from the original Email.
Previewing a Draft Email
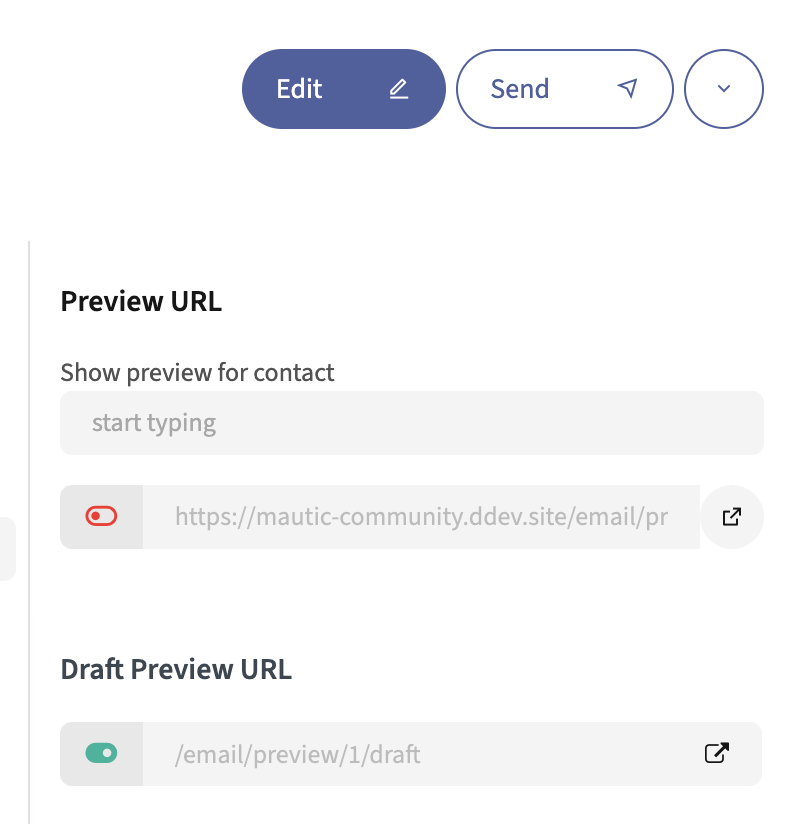
An Email Draft may be previewed by appending /draft to the end of the Email preview URL. If an Email has a Draft version, a Draft Preview URL will be present on the Email details page below the regular Preview URL.
Translations
When creating the Email, there is an option to assign a language and a translation parent. By selecting a translation parent, the current item is then considered to be a translation in the selected language of that parent item. If a Contact has a preferred language set, they receive the translated version in their preferred language if it exists. Otherwise, they receive the parent in the default language.
It’s also possible to have translations of A/B test variants.
From Mautic 5.1 it’s possible to preview A/B and Translation variants:

The rendered preview on the Email details page reloads automatically when you switch between variants and translations. For more information, see Email content preview.
Cloning Emails
Cloning an Email creates an editable copy that you can adjust and save as a new Email. This is useful when you want to reuse the content and settings of an existing Email as a starting point.
There are two ways to clone an Email:
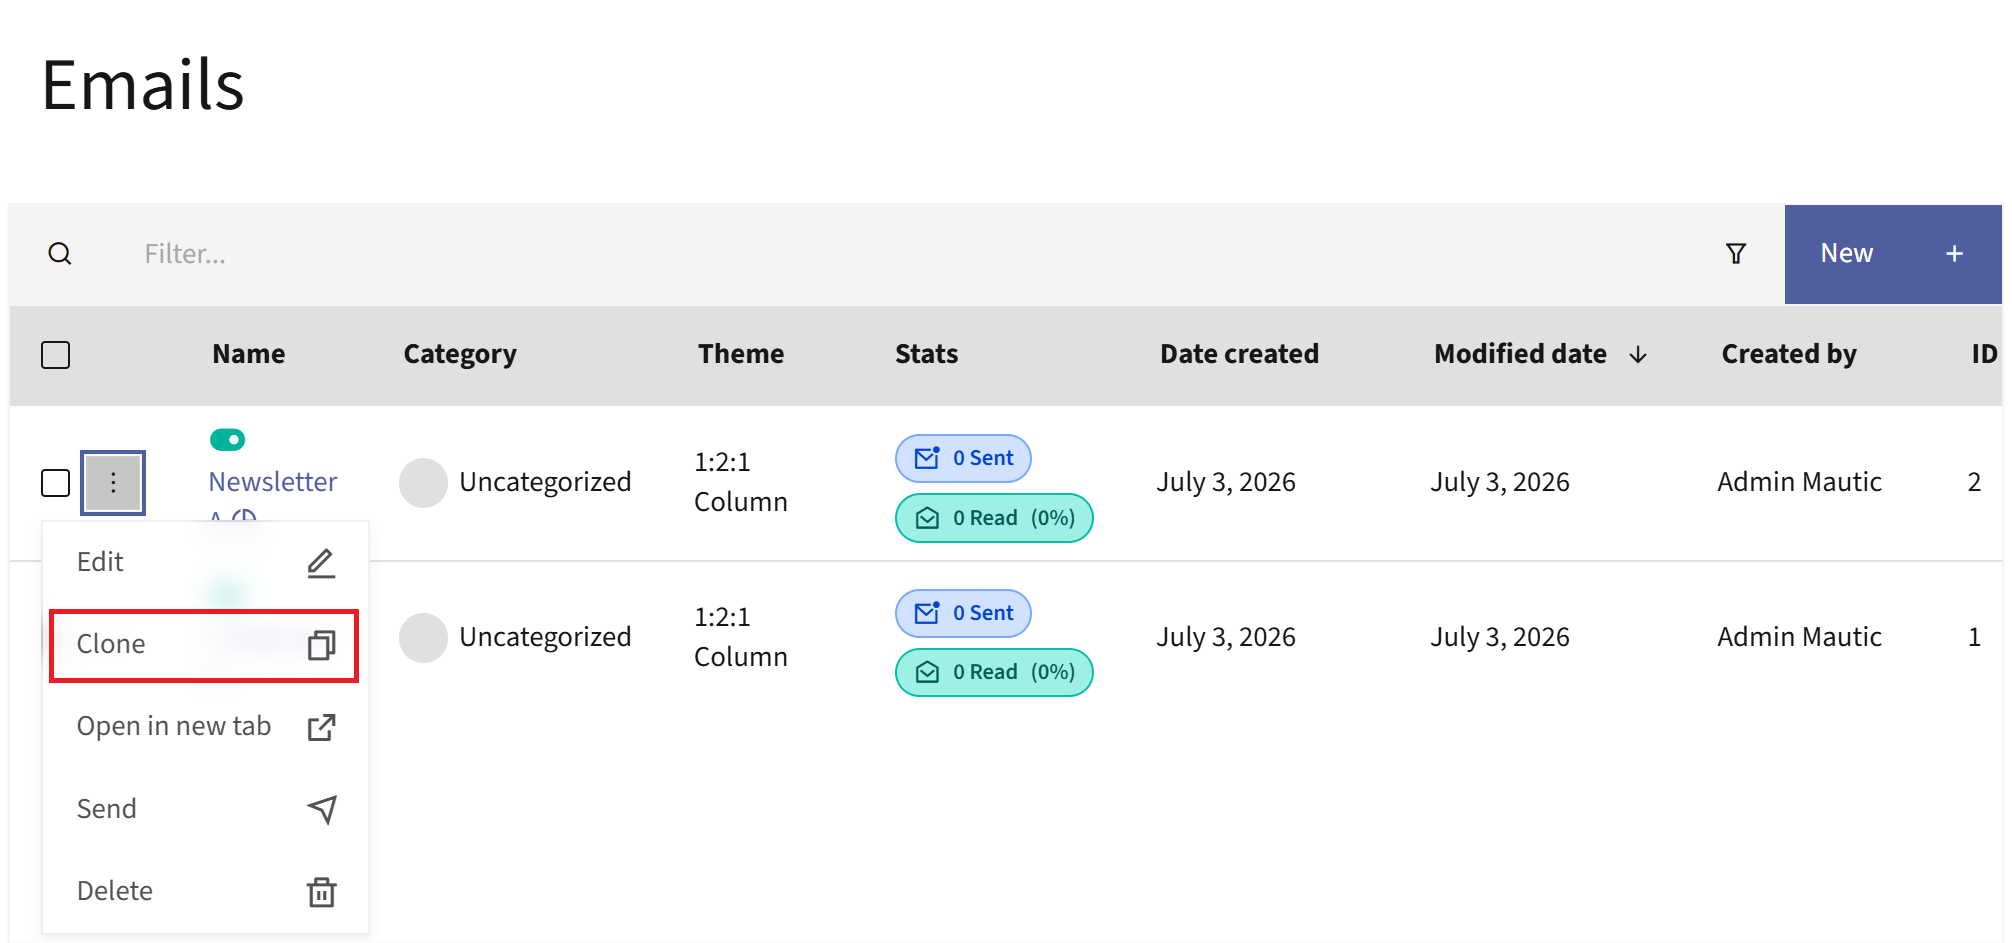
From the Email listing:
In the Email row, click the three-dots icon next to the checkbox to open the Options menu.
Select Clone.
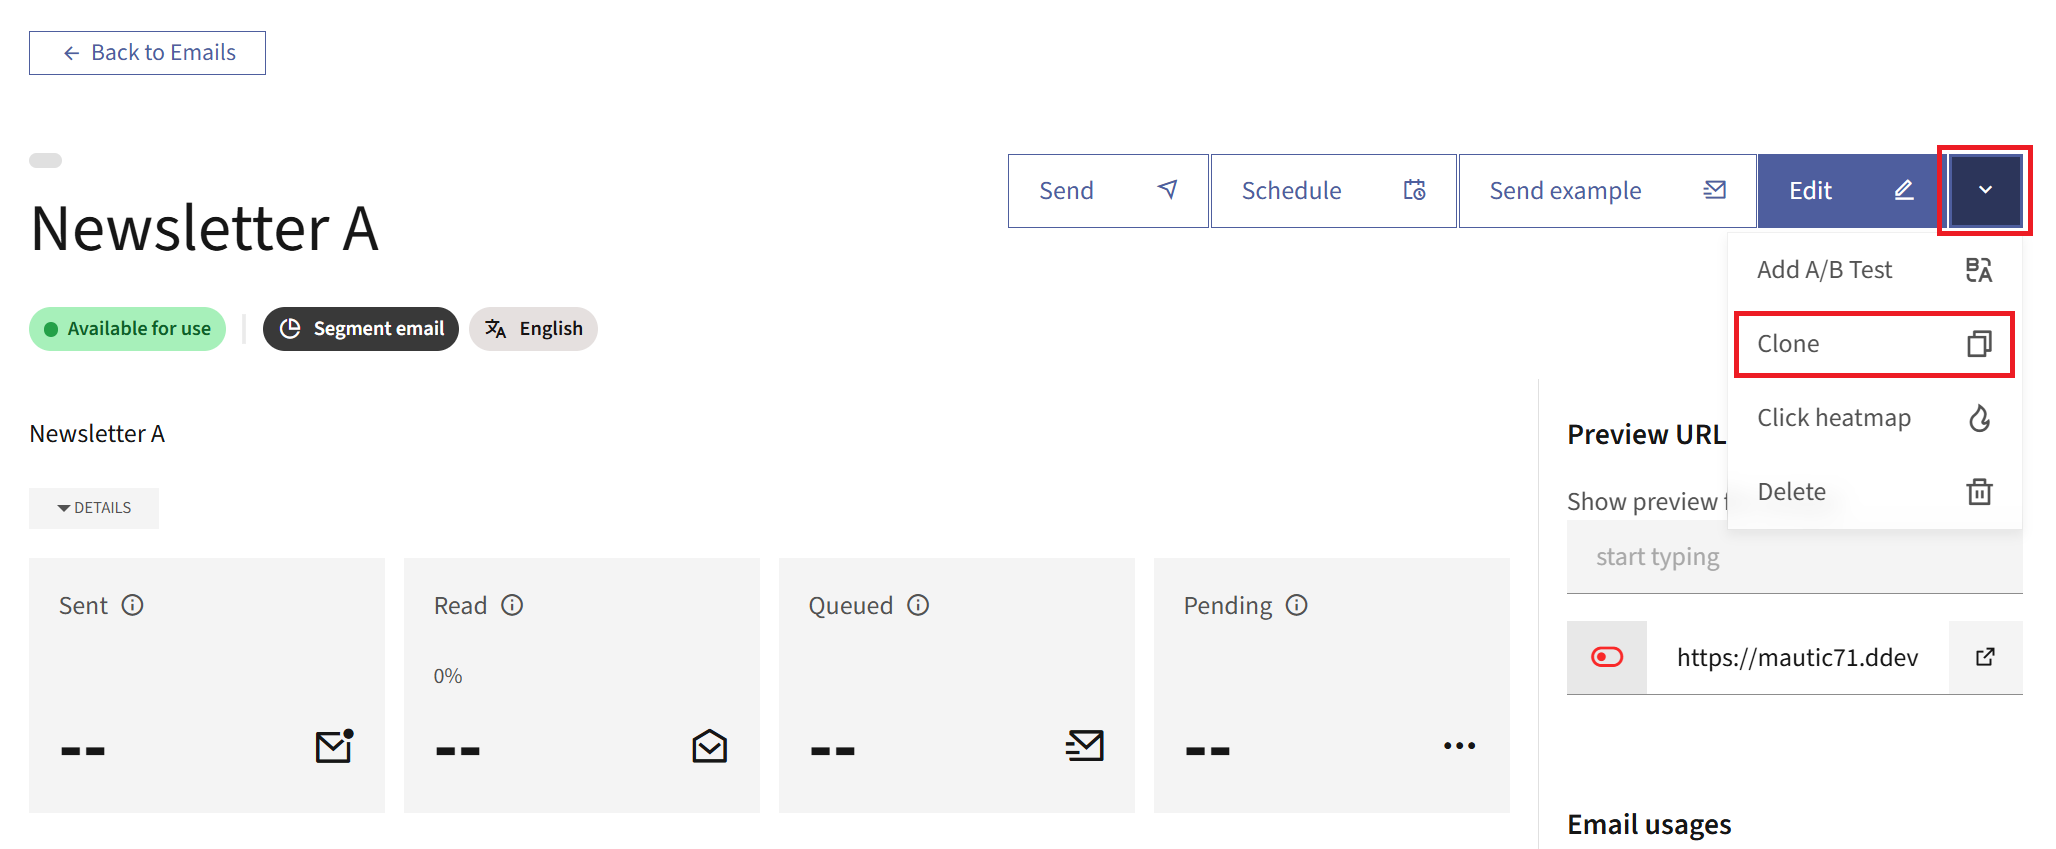
From the Email detail view:
Click the down arrow button next to Schedule to open the Options menu.
Select Clone.
Either way, Mautic opens the copy in the Email editor with the original content and settings pre-populated. Adjust the copy as needed, then save it to create the new Email.
Nota
Cloning requires permission to create Emails. If you don’t have the permission, the Clone option doesn’t appear.
Clone with translations and variants
If an Email has translations or A/B variants, cloning the entire group in one step is possible using Clone with translations and variants.
To clone an Email with its translations and variants:
Click the parent Email to view the details.
Click the down arrow button next to Schedule to open the Options menu.
Select Clone with translations and variants.

Click Clone with translations and variants in the confirmation dialog.
After confirmation, Mautic creates new Unavailable copies of:
The parent Email
All translation children
All A/B variant children
All translations of A/B variants
Each cloned Email has (copy) appended to its name and you can edit it independently. The cloned group maintains the same translation and variant structure as the original.
Nota
The Clone with translations and variants option is only available for parent Emails - not for translation children or variant children.
Sending an example Email
The Send example action sends a test copy of the Email to a recipient you choose, directly from the Email listing. The same action is also available from the Email detail view.
In the Email row, click the three-dots icon next to the checkbox to open the Options menu.
Select Send example.
In the modal, review or enter the recipient Email addresses and optionally choose a Contact, then confirm to send the example Email. Selecting Cancel closes the modal without sending anything.
Nota
Example Emails go to a Mautic User rather than a Contact, so trackable links and the unsubscribe link behave differently. See Email link tracking and Unsubscribe link doesn’t work for details.
Base64 encoded images
It’s possible to encode all images in the Email text as base64. It attaches the image inside the Email body. It has several implications:
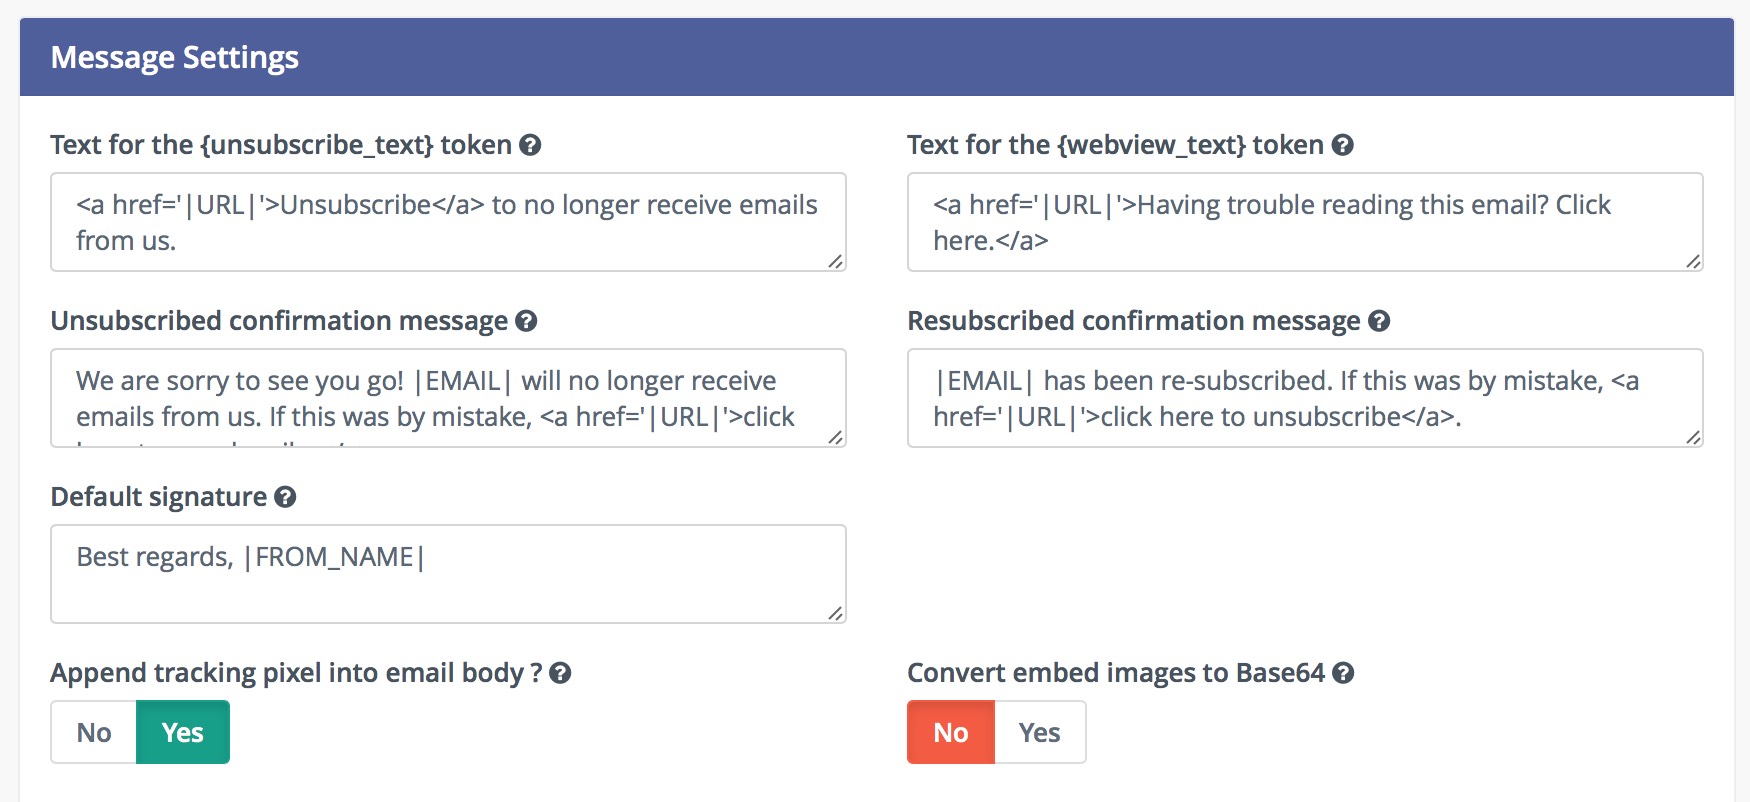
The main idea with this option is that most of the Email clients display the images directly, without the need to allow images.
Some Email clients like GMail require the approval to display Base64 encoded images due to the tracking pixel being an image, and won’t display the Base64 encoded images as a result. See the next paragraph for possible solution.
The Email body increases significantly if the Email contains many and/or large sized images. Some Email clients like GMail «clip» such messages and won’t display it directly.
Tokens
Mautic allows the use of tokens in Emails which gives the marketer the possibility to integrate a number of Contact fields in your Emails. These can be easily placed within your Emails and are automatically replaced with the appropriate text once sent.
Check the Variables documentation for a list of all the available default fields.
Tokenized From addresses
Mautic allows you to use Contact field tokens in the From address and From name fields. This makes Emails appear as though they’re coming from a Contact-specific sender, such as their assigned Company.
You can use tokens in:
The Name to send mail as and Email address to send mail from fields in the system-wide Email Settings
The From Name and From Address fields on an individual Email’s Advanced tab
For example, to send Emails from the Contact’s Company:
{contactfield=companyname|Default Name}
{contactfield=companyemail|info@default.com}
The token format follows the standard Contact field syntax. You can include an optional default value after the | character. If Mautic can’t resolve the token to a value, it uses the default value instead.
Nota
The Contact field used in the Email address must contain a valid Email address. If using a Custom Field, ensure it’s configured as an Email field type to guarantee proper validation.
When sending Emails, Mautic determines the From address using the following priority order:
Tokenized Email Advanced From - If the Email’s Advanced tab has a From address with a Contact field token, and that token resolves to a valid value for the Contact, Mautic uses that address.
Owner sender - If you enable Mailer is owner and the Contact has an assigned owner, Mautic uses the owner’s Email address.
Plain Email Advanced From - If the Email’s Advanced tab has a standard Email address, without tokens, Mautic uses that address.
System default sender - Mautic falls back to the system default from Email Settings. If the system default contains tokens, Mautic resolves them. If token resolution fails, Mautic uses the token’s default value.
This hierarchy ensures Emails always have a valid sender while allowing personalization when Contact data is available.
Email Reply to address - If the Email’s Advanced tab has a Reply to address, Mautic uses that address.
Contact Owner address - If you enable Use owner as mailer, Mautic uses the Contact Owner’s Email address for each owner group in the batch.
Email From address - If you haven’t configured a global
reply-toin Email Settings, Mautic uses the Email’s From address.System fallback - Mautic falls back to the global Reply to address in Email Settings, or the system From address when that’s blank.
This means replies to queued Emails route back to the Contact Owner when you send as the Owner, matching how Mautic already resolves the From address.
Default value
A token can have a default value for cases when the Contact doesn’t have the value known. You must specify the default value after a | character, for example:
Hello {contactfield=firstname|friend}
The |friend tells Mautic to use “friend” if there is no first name present in the Contact field.
Encoded value
It’s possible to encode values used in a token using the following syntax:
Hello {contactfield=firstname|true}
The |true tells Mautic to encode the value used, for example in URLs.
Date formats
To use custom date fields in tokens, use the following format:
{contactfield=DATEFIELDALIAS|datetime}
{contactfield=DATEFIELDALIAS|date}
{contactfield=DATEFIELDALIAS|time}
The date outputs in a human-readable format, configured in the settings in your Global Configuration > System Settings under “Default format for date only” and “Default time only format”.
Label modifier for select and boolean fields
For select and boolean field types, you can display the human-readable label instead of the stored value by using the |label modifier:
{contactfield=select_alias|label}
{contactfield=bool_alias|label}
This is particularly useful when these fields contain technical values, but you want to show user-friendly labels in your Emails. For instance:
A country selection field storing
uscan displayUnited StatesA boolean field storing
1can displayYes
The modifier also works with Company fields:
{contactfield=company_select_alias|label}
{contactfield=company_bool_alias|label}
Tokens in link URLs
You can place Contact field and Owner field tokens inside a link’s URL in your Email, not just in the body text. Mautic resolves the token to the Contact’s value when they click the link, so each recipient goes to a personalized destination.
For example, if you add this link to an Email:
<a href="https://blog.example.com/author/{ownerfield=firstname}/">Read more</a>
Mautic redirects a Contact whose Owner’s first name is “Alex” to https://blog.example.com/author/Alex/.
Owner field tokens resolve to the field value of the Contact’s assigned Owner, who is a Mautic User. The available Owner field tokens are {ownerfield=firstname}, {ownerfield=lastname}, {ownerfield=email}, {ownerfield=position}, and {ownerfield=signature}. See Variables for the full list of tokens.
Nota
Mautic resolves link URL tokens when the Contact clicks the link, so this only applies to tracked links. If you turn off tracking for a link, Mautic doesn’t resolve the tokens in its URL.
If the Contact has no Owner, or the Owner field is empty, Mautic replaces the token with an empty string. This can produce a malformed URL, such as
https://blog.example.com/author//. Account for missing Owner values when you build link URLs with Owner field tokens.
Contact replies
To make use of monitoring replies from Contacts, you must have access to an IMAP server other than Google or Yahoo as they overwrite the return path, which prevents this feature from working.
Nota
To use the Monitored Email feature you must have the PHP IMAP extension enabled - most hosts already have this turned on.
Configure all Mautic sender/reply Email addresses to send a copy to one single inbox - most Email providers support this feature in their configuration panel.
Nota
It’s best to create an Email address specifically for this purpose, as Mautic reads each message it finds in the given folder.
Go to the Mautic configuration and set up the inbox to monitor replies.
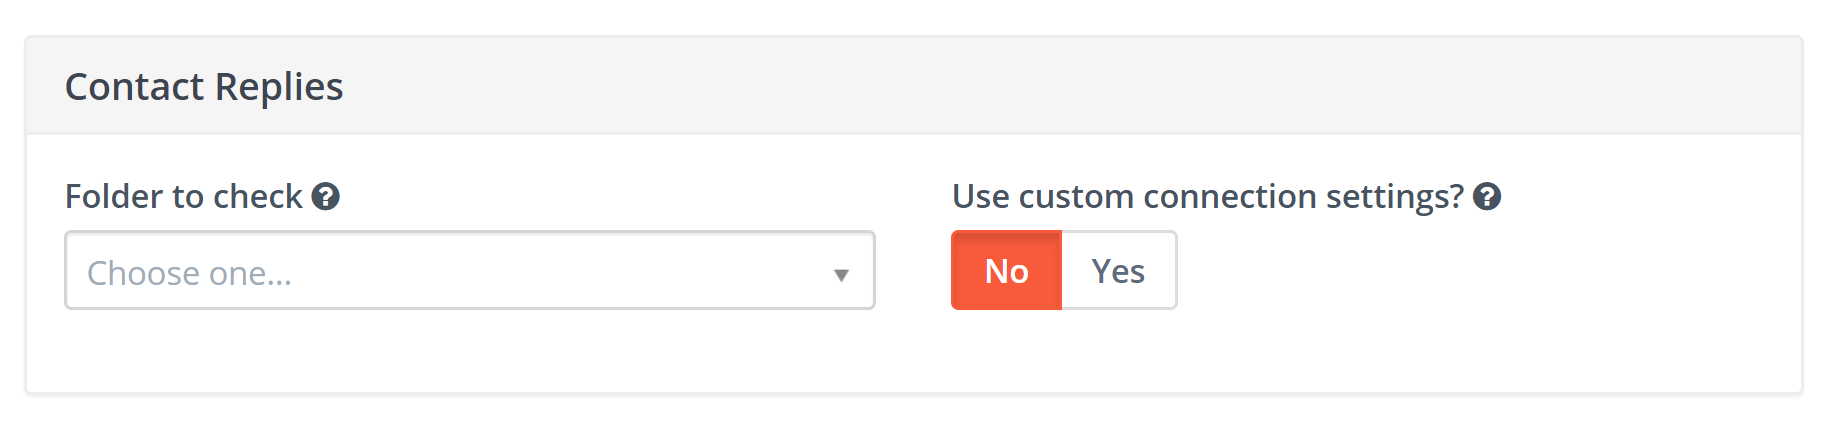
To fetch and process the replies, run the following Cron command:
php path/to/mautic/bin/console mautic:email:fetch
Usage
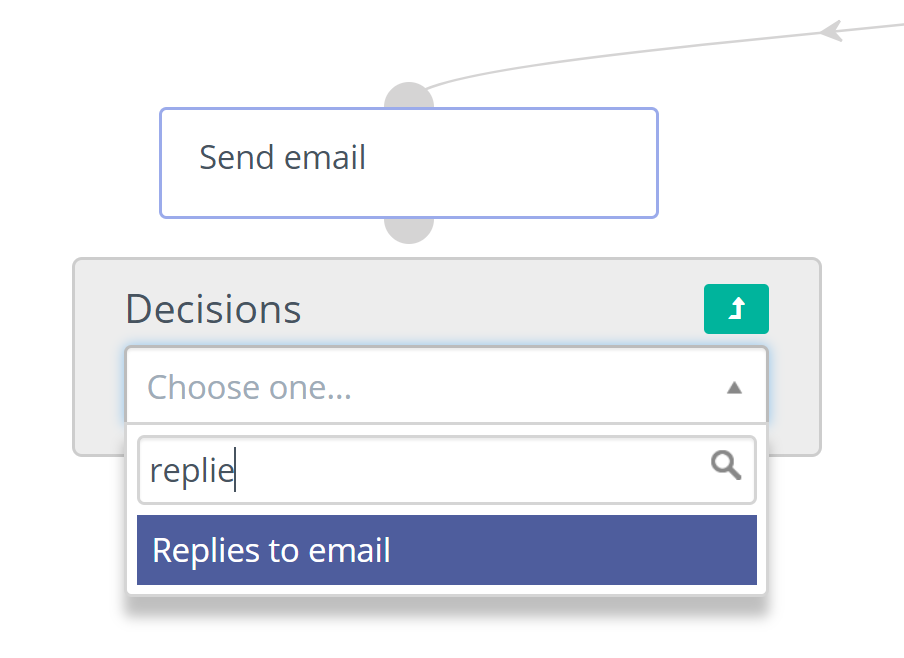
Contact replies within Campaigns function as decision after an Email Send action, to take further action based on whether the Contact has replied to the Email. Mautic tries to read the inbox, parse messages, and find replies from the specified Contact. The Contact, when matched with an incoming reply, proceeds down the positive path immediately after the reply detection.
Mailer as Owner
This feature allows Mautic to automatically personalize Emails sent to a Contact who has an owner (Mautic User) assigned to them. This feature changes the from Email, from name and signature by changing the default setting to the Mautic Contact owner’s User setting.
Sending from the Contact owner
Open the Admin menu by clicking the cog icon in the top right corner.
Select the Configuration menu item.
Select the Email Settings tab.
Switch the Mailer is owner to Yes.
Save the configuration.
Overriding the mailer as owner setting
It’s possible to override the global setting on a per-Email basis.
There is a switch under the advanced settings of the Email, which allows you to decide whether to take the global mailer as owner setting, or the specified from address, into account.
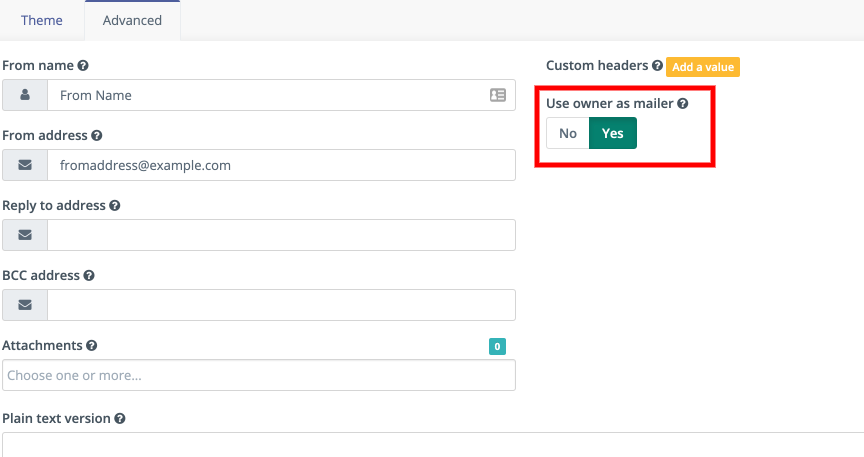
If set to Yes, the global setting takes precedence.
If set to No, Mautic uses the address and name supplied in the Email “From” fields.
Send to unsubscribed contacts
The Send to unsubscribed contacts toggle allows you to send Emails to Contacts who have unsubscribed from your communications. This feature is available in the Advanced tab for both Template and Segment Emails.
Use this option for truly transactional communications that Contacts must receive regardless of their subscription status, such as:
Terms and conditions updates
Legal notifications
Account-related communications
Service announcements
Enabling the toggle
Open the Email you want to edit.
Click the Advanced tab.
Set Send to unsubscribed contacts to Yes.
A warning message appears asking you to confirm this action, as sending Emails to unsubscribed Contacts may have legal implications.
Confirm to enable the setting, then save the Email.
Aviso
In many countries, sending marketing Emails to Contacts who have unsubscribed is illegal. This feature exists solely for genuinely transactional communications such as receipts, password resets, legal notices, and account updates—not marketing content.
Misusing this feature to send marketing or promotional Emails to unsubscribed Contacts can result in serious legal consequences, including fines and penalties under data protection regulations such as the General Data Protection Regulation - GDPR, the Controlling the Assault of Non-Solicited Pornography And Marketing Act - CAN-SPAM Act, or Canada’s Anti-Spam Legislation - CASL.
Nota
Enabling this toggle requires the Send to unsubscribed contacts Email permission assigned to your Role. See Setting Role permissions for details on configuring permissions.
Frequency rules behavior
The Send to unsubscribed contacts setting configured in the Email’s Advanced tab determines whether an Email counts towards the Contact’s frequency rules limits.
When you set Send to unsubscribed contacts to No, the Email counts towards the Contact’s frequency rule limits. If a Contact has reached their limit, Mautic postpones the Email until the limit resets.
When you set Send to unsubscribed contacts to Yes, the Email doesn’t count towards frequency rule limits. Mautic delivers important transactional communications regardless of how many other Emails the Contact has received.
Signatures
Setting a signature happens in two places:
The default signature is in the Configuration > Email Settings tab. The default text is:
Best regards,<br/>|FROM_NAME|.
Mautic replaces the
|FROM_NAME|token with the name defined in the Email Settings tab.Mautic uses this signature when the Email doesn’t have Use owner as mailer enabled.
Each Mautic User can configure their own signature in their account settings. Mautic uses this signature when the Email has Use owner as mailer enabled and the Contact has an owner assigned.
Importante
For the
{signature}token to use the owner’s signature, you must enable Use owner as mailer in the Email’s advanced settings. Enabling only the global Mailer is owner setting in Configuration isn’t sufficient.If the owner hasn’t configured a signature, the
{signature}token resolves to empty when you enable owner-as-mailer.
Nota
When a User sends an Email directly from a Contact’s profile, Mautic uses the logged-in User’s signature with the “From” name and email address specified in the Send email form, not the Contact owner’s signature. Mautic pre-fills these values with those of the logged-in User.
This applies regardless of whether the Contact has a different owner assigned, or no owner at all. The same behavior applies when sending test Emails.
Using the Email signature
Marketers can place the signature into an Email using the {signature} token.
Tracking Opened Emails
Mautic automatically tags each Email with a tracking pixel image. This allows Mautic to track when a Contact opens the Email and execute actions accordingly. Note that there are limitations to this technology - the Contact’s Email client supporting HTML and auto-loading of images, and not blocking the loading of pixels. If the Email client doesn’t load the image, there’s no way for Mautic to know the opened status of the Email.
By default, Mautic adds the tracking pixel image at the end of the message, just before the </body> tag. If needed, one could use the {tracking_pixel} variable within the body content token to have it placed elsewhere. Beware that you shouldn’t insert this directly after the opening <body> because this prevents correct display of pre-header text on some Email clients.
It’s possible to turn off the tracking pixel entirely if you don’t need to use it, in the Global Settings.
Tracking links in Emails
Mautic tracks clicks on each link in an Email, with stats displayed at the bottom of each Email detail view under the Click Counts tab. You can sort tracked links by clicking the Click Count column header. The first click sorts highest to lowest, and a second click reverses the order. This helps you identify which links get the most engagement.
You can turn off tracking for a certain link by adding the data-mautic-disable-tracking="true" HTML attribute.
For example:
<a href="https://mautic.example.com/" data-mautic-disable-tracking="true">Non tracked link</a>
Nota
Use data-mautic-disable-tracking="true" for all new Emails and templates, as Mautic has deprecated the mautic:disable:tracking attribute.
Link validation
When you save an Email, Mautic validates every link it contains. If a link’s href uses an invalid format - for example ://example.com, which has no scheme - Mautic blocks the save and shows an error such as “The email contains an invalid URL: ://example.com”.
A link is valid when its href:
Uses one of these seven schemes:
http,https,ftp,ftps,mailto,tel, orsmsIs an anchor link that starts with
#Is a Mautic token such as
{unsubscribe_url}
Unsubscribing
Mautic has a built in means of allowing a Contact to unsubscribe from Email communication. You can insert various tokens into your Email to provide unsubscribe options at your desired location:
- {unsubscribe_text}: inserts a sentence with a link instructing the Contact to click to unsubscribe.
- {unsubscribe_url}: inserts the URL to the preferences center when it’s activated, or to the unsubscribe page if not.
- {resubscribe_url}: inserts the URL to the resubscribe page regardless of whether there’s a preference centre in use. It resubscribes the Contact. Useful for double opt out Campaigns.
- {dnc_url}: inserts the URL to unsubscribe from all Marketing Messages when you activate the preference center.
The unsubscribe URL token inserts the URL into your custom written instructions.
For example:
<a href="{unsubscribe_url}" target="_blank">Manage your email preferences</a>
<a href="{dnc_url}" target="_blank">Unsubscribe from all emails</a>
You can find the configuration of the unsubscribe text in the global settings.
Online version
Mautic also enables the hosting of an online version of the Email sent. To use that feature, simply add the following as URL on text to generate the online version link {webview_url}.
For example:
<a href="{webview_url}" target="_blank">View in your browser</a>
Bounce management
Mautic provides a feature which allows monitoring of IMAP accounts to detect bounced Emails and unsubscribe requests.
Note that Mautic makes use of «append» Email addresses. The return-path or the list-unsubscribe header uses something like youraddress+bounce_abc123@example.com. The bounce or unsubscribe allows Mautic to determine what type of Email it’s when it examines the inbox through IMAP. The abc123 gives Mautic information about the Email itself, for example which Contact it was it sent to, what Mautic Email address it originated from, etc.
Some Email services overwrite the return-path header with that of the account’s Email (GMail, Amazon SES). In these cases, IMAP bounce monitoring won’t work.
Elastic Email, SparkPost, Mandrill, Mailjet, SendGrid and Amazon SES support Webhook callbacks for bounce management. See below for more details.
Monitored inbox configuration
To use the Monitored Email feature you must have the PHP IMAP extension enabled (most shared hosts already have this turned on). Go to the Mautic configuration and fill in the account details for the inbox(es) you wish to monitor.
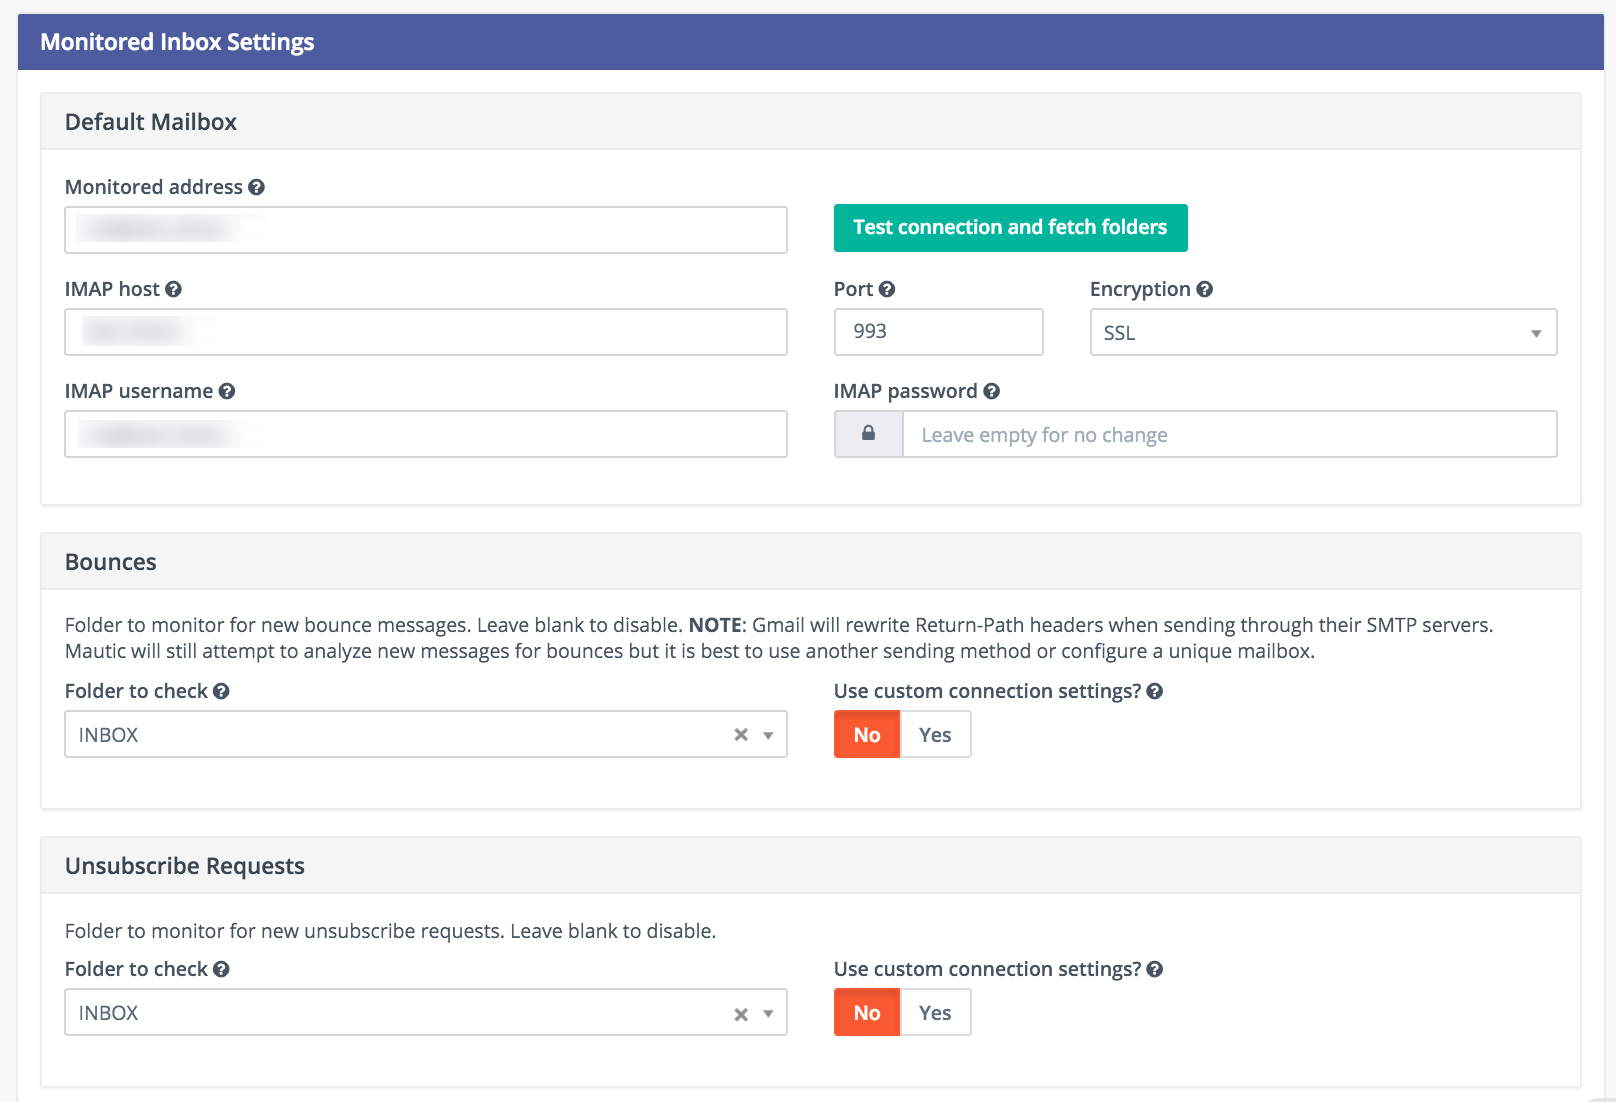
It’s possible to use a single inbox, or to configure a unique inbox per monitor.
To fetch and process the messages, run the following command:
php /path/to/mautic/bin/console mautic:email:fetch
Note that it’s best to create an Email address specifically for this purpose, as Mautic reads each message it finds in the given folder.
If sending mail through GMail, the Return Path of the Email is automatically rewritten as the GMail address. It’s best to use a sending method other than GMail, although Mautic can monitor a GMail account for bounces.
If you select an Unsubscribe folder, Mautic also appends the Email as part of the «List-Unsubscribe» header. It then parses messages it finds in that folder and automatically unsubscribe the Contact.
Webhook bounce management
Since Mautic 5 all the Email transports use the same Webhook - sometimes called callback - URL: https://mautic.example.com/mailer/callback. Please follow the documentation for the specific Email transport you’ve installed to get more information about the Webhook configuration.
Create a Segment with bounced Emails
This isn’t required, but if you want to be able to select the Contacts with bounced Emails easily - for example to delete all bounced Contacts - create a Segment with bounced Emails.
Go to Segments > New.
Type in the Segment name. For example Bounced Emails.
Select the Filters tab.
Create new Bounced Email equals Yes filter.
Wait for the
bin/console mautic:segments:updatecommand to be automatically triggered by a Cron job or execute it manually.All Contacts with bounced Emails should appear in this Segment.
Troubleshooting Emails
Email open tracking
Mautic tracks Email opens using a tracking pixel. This is a 1 pixel GIF image in the source code of Email messages sent by Mautic.
When a Contact opens an Email using an Email client like Outlook, Thunderbird, or GMail, the client tries to load the images in it. The image load request is what Mautic uses to track the Email open action.
Some Email clients have auto loading images turned off, and Contacts have to selectively «Load Images» inside an Email message. Some automatically open all images before delivering the Email to the Contact.
If the images aren’t loaded for this reason or another, or if they’re opened automatically before sending the Email on to the Contact, Mautic doesn’t know about the open action. Therefore, Email open tracking isn’t very accurate.
Email link tracking
Before sending an Email, Mautic replaces all links in the Email with links back to Mautic including a unique key. If the Contact clicks on such a link, the link redirects the Contact to Mautic, which then tracks the click action and redirects the Contact to the original location. It’s fast, so the Contact doesn’t usually notice the additional redirect.
If the Email click doesn’t get tracked, make sure that:
Your Mautic server is on an accessible URL.
You sent it to an existing Contact via a Campaign or a Segment Email. Emails sent by the Send Example link, direct Email from the Contact profile, or Form submission preview Emails won’t replace links with trackable links.
Make sure the URL in the href attribute is absolute and valid. It should start with
http://or ideallyhttps://.You’ve opened the link in a incognito browser (not in the same session where you’re logged into Mautic)
Check if Mautic replaced the link in the Email with a tracking link.
Unsubscribe link doesn’t work
The unsubscribe link doesn’t work in test Emails.
This is because Mautic sends test Emails to a Mautic User and not to a Mautic Contact.
Mautic Users can’t unsubscribe and therefore the unsubscribe link looks like this: https://mautic.example.com/|URL|. However, the link does work correctly when you send the Email to a Contact.
Best practice is to create a Segment with a small number of Contacts to receive test Emails - for example, yourself - which ensures that you can fully test features such as unsubscribe behaviour.